Deployment
Deployment Protocol
About this Protocol
This document describes how to deploy the Connectome Annotation Versioning Engine system on google cloud. It is a working document meant to capture the present set of practices. It began as a specific set of instructions for the Princeton/Allen team deploying the first deployment, but has been adopted to be a general purpose set of instructions designed to be followed by others. It is a work in progress, and edits and suggestions are welcome as we expect points of friction to be experienced.
System Requirements
These web-services were designed to be deployed on google cloud, using a local computer to coordinate that deployment. Therefore, to deploy these services yourself you need to have a google cloud account, as well as a computer running Linux or Mac OS X to utilize the deployment scripts. We have successfully utilized Mac OS 12.2 and Arch Linux, though many OS versions with access to a modern unix terminal will work. We don’t presently have any experience attempting to do this deployment with a Windows machine, and we do not expect it to work without modifications. We would welcome contributions to make this protocol work on Windows.
Install Time
Setting up and getting a deployment working from absolute scratch will likely take an engineer experienced with the use of cloud services and kubernetes 8-12 hours of work.
Terminology
- Global (deployment): a kubernetes cluster and associated sub-domain name that contains service that apply to many local deployments (presently auth, info, schema, jsonstateserver)
- Local (deployment): a kubernetes cluster and associated sub-domain name that contains services specific to a datastack (see below). It will utilize services provided by the global deployment, most critically the auth and info service.
- Dataset: Term used by Auth to refer to a resource for which permissions are uniform.
- Permission Group: Term used by info service (see below) that means the same as dataset. (intend to remove from info service and merge into auth service in the future)
- Table Mapping: A mapping from a table_id > dataset/permission group that lives in a service namespace. (currently lives in the info service, intend to move to auth)
- Group: A set of users that have a set of permissions on a dataset/permission group.
- Aligned volume: An aligned set of images (could be associated with multiple segmentations) with a set of annotations applied.
- Datastack: An aligned volume paired with segmentation. The primary way users will refer to a coherent analyzable set of data.
Micro-Services
- Info: A service for storing basic metadata about data, presently datastack, aligned_volume, permission_group and table_mapping. GitHub Repo
- Auth: A service for controlling authorization on top of authentication provided by Google OAuth. GitHub Repo
- Sticky Auth: A second deployment of auth which has stick_sessions turned on. This is useful for certain operations that require sticky sessions, such as the flask-admin interface, whereas the other pods for auth do not require it and can distribute traffic more easily. There are no code base changes, only deployment changes.
- Schema: A service for storing/serving presently supported annotation schemas. Note this is also a library that is utilized by AnnotationEngine and MaterializationEngine to generate database schemas. GitHub Repo
- Jsonstateserver: A service for posting and retrieving json states. Intended to provide support for neuroglancer link shortening. Backed by Google Datastore (future version to place json in bucket storage). GitHub Repo
- AnnotationEngine: A service for creating, reading and updating annotations on aligned volumes, independent of segmentation. Backed by postgreSQL and postGIS. GitHub Repo
- MaterializationEngine: A service to keep a set of annotations up to date with a segmentation. Shared codebase also contains an API to query these annotations, and a worker to process these annotations. Backed by postgreSQL and postGIS, workflow powered by celery with a redis broker. GitHub Repo
- Pychunkedgraph (PCG): A service to dynamically proofread and track a supervoxel graph of a segmentation. Stores graph in a dynamic oct-tree backed by Google BigTable. Abbreviation PCG. Transmits activity via google pub-sub, presently consumed by Meshing and L2cache. GitHub Repo
- Meshing: A service to track, serve and regenerate meshes from a dynamic segmentation (shared codebase with the PCG). Has a worker component as well, driven by google pubsub. GitHub Repo
- L2Cache: A service to track, serve and regenerate summary statistics of “level 2” fragments of segmentation in the PCG. Has a worker component for calculating statistics, driven by google pub-sub. GitHub Repo
- Guidebook: A flask app service for creating neuroglancer links with annotation points to guide proofreaders to tips and branches. GitHub Repo Utilizes PCG aware skeletonization procedures GitHub Repo
- Dash: A flask app for serving dash apps that are protected by auth. GitHub Repo. Currently only serving dash-connectivity-viewer apps, provides interactive analysis UI of connectivity and cell types, along with dynamic neuroglancer link generation GitHub Repo
- ProofreadingProgress: An app designed for FlyWire to track proofreading progress GitHub Repo
- Proofreading Management: TBD. GitHub Repo (not public and not generalized past flywire)
- Proxy Map: This is a deprecated service for redirecting traffic to a google bucket which is not publicly readable. Requests are rerouted to a configurable set of google buckets, with an authorization header that is attached by the server to allow the user to get access to the bucket. The resulting data is simply forwarded back to the user. Connections to these endpoints are protected by the authorization service and so access can be limited in this way. Allows neuroglancer communication. GitHub Repo (not public repo)
Access Tools
- CaveClient: Python library for accessing various microservice endpoints. GitHub Repo Docs
- CloudVolume: Python library for accessing images, segmentation, meshes and skeletons from precomputed and CAVE (i.e. graphene protocol) sources. GitHub Repo Docs
- MeshParty: Python library that wraps around cloudvolume to provide analysis and visualization functionality on top of meshes and skeleton. GitHub Repo Docs
- Pcg_skel: Library for running skeletonization that integrates the chunkedgraph level2 graph, and the l2cache. GitHub Repo Docs
- Navis: Python library wrapped around many other libraries that gives analysis tools for analyzing neurons. Integrates with cloud-volume and caveclient. Focused mostly on fly neurons, but provides general blender integration for example. GitHub Repo Docs
General instructions
Google Project Permissions
You will need access to a google project where you have sufficient permissions (todo spell these out)
Minimal required permissions: - Project IAM Admin - Service Account Admin - Service Account Key Admin - Permissions for Google Cloud Data Store - datastore.locations.list - appengine.applications.create - servicemanagment.services.bind - Permissions for Google Cloud DNS API - serviceusage.services.enable
Domain
Have a registered domain with control over where DNS points to (e.g. buy one here:
https://domains.google/). You can also use a test domain, which can then be swapped out by
the real domain later in the process.
Local development machine setup
Packages and libraries
1. Configure google sdk on your deployment machine
2. Checkout the deployment repo at https://github.com/CAVEConnectome/CAVEdeployment
3. Install helm on local machine. Follow instructions here
https://helm.sh/docs/using_helm/#installing-helm
4. Setup a local python environment (e.g. using anaconda) and install jinja2 (pip
install jinja2). This is only required for running jinja2, so no strong versioning
requirements are needed here. We generally run python 3.6-3.8.
5. We have only deployed this using Linux or Mac laptops, no instructions/support for
Windows at present. Would welcome someone to work out the issues, but is not a
project we are going to take on.
Google project setup
- Setup a bigtable instance in your google could project: (Used to store the PCG)
- Select the SSD (low latency) option.
- Choose the manual node scaling option
- Data replication must be turned off, as it would disable atomic row
transactions such as counter increments, and break strong consistency
- Select the SSD (low latency) option.
- Setup a datastore (used to store shortened NGL links)
- Select datastore mode
- Select a region
- Select datastore mode
- global DNS setup: domain name forwarding (tutorial is for google domains, needs to
be adapted if you have a different domain registrar and you only need to do a subset
of the steps, but principles still apply).. Tried to copy out there relevant- In the Cloud Console, go to the Create a DNS zone page.
Go to Create a DNS zone
- For the Zone type, select Public.
- For the Zone name, enter my-new-zone.
- For the DNS name, enter a DNS name suffix for the zone by using a
domain name that you registered (for example, example.com).
- For DNSSEC, ensure that the Off setting is selected.
- Click Create to create a zone populated with the NS and SOA records.
- On the Zone details page, click Registrar Setup on the top right to
access the NS records. Make a note of the NS records because you
need these records in the next steps.
To update name servers in Google Domains, follow these steps:
If you are not using Google Domains you’ll have to forward nameservers using
whatever interface your registrar provides- To update the name servers for your domain, (if using google domains
go here.. Google Domains.)
- Click the domain that you set up in Step 1. Alternatively, you can click
the Manage link for that domain.
- On the left navigation menu, click DNS.
- For Name servers, select Use custom name servers.
- In the Name server field, enter the NS records that you copied from the
Zone details page (for example, ns1.googledomains.com) one at a
time.
- To add name servers, click Add.
- Update all four name servers on your Google Domains DNS page using
the records you recorded in step g above.
- Click Save.
- To update the name servers for your domain, (if using google domains
- In the Cloud Console, go to the Create a DNS zone page.
- Setup a oauth credential in google cloud console
- In google cloud go to API & Services > Credentials > Create credentials >
oauth client id
- Select web application as a type
- Set TBD as the FQDN and TBD as the authorized redirect URI
- In google cloud go to API & Services > Credentials > Create credentials >
Environment files
Create a PRIVATE repository to store your configured deployment environment variables. It
can be empty to start, you are going to copy things into it that we will help you create. This
will contain all the things that are particular to your deployment, like the name of your
datastacks, your domain name, which services you want to deploy, what versions they are,
how large you want to let various services scale, what schedule for materialization you want
to run, what your postgres password is, etc. Everything that is setup to be configurable in
the deployment is stored or referenced from these environment variables. This repository
will contain secret information. If you are the sole maintainer it can be a directory on your
computer, but if you are collaborating on maintaining the infrastructure then it will be
essential to have the versions of your configurations in source control.
Clone that repository somewhere on your disk (we decided to do it as a subdirectory of the
main repository called “environments”). We will refer to this location as your “environment
repository”.
Edit env_config.sh to write down the local path to your environment repository. If for example
you created a private repo and checked it out in your home directory of your linux machine it
might be “/home/my_username/my_private_repo_name”.
We have created a cookiecutter style templating pattern to help you create your first
environment files (render_global_env.py and render_local_env.py), but we expect after you
create them you will edit those files directly. We have tried to only include configuration
variables in the cookie cutter that we cannot make suggestions for. There are many more
configuration parameters in the environment file that you will need to adjust over time or to
tune performance. For example, the template contains our present production versions of
various services, which will evolve over time. We recommend simply editing the
environment file when updating services and not re-materializing a new environment file
from the template.
Edit or make a copy of the render_global_env.py file to fill in your specific variables.
Below are some explanations of what the variables you find in that file mean.
"environment_name": "global-depl",
# this will be the XXX in XXX.DOMAIN_NAME. You can setup alternative prefixes for
the same server if you want. We often do something like global3, with an alias to
global. So that we keep updating the specific server, but change the DNS of global to
the most recent one.

"project_name": "my_project",
# this is the ID of your google project

"depl_region": "sweet-sweet-kingdom",
# this is the region in google cloud you want to deploy things to (needs to be a valid
google region) optimal to make it the same region where your bigtable and buckets
are located. Should be the same as the region of the bigtable instance

"depl_zone": "sweet-sweet-kingdom-a",
# this is the zone in google cloud you want to deploy things to (needs to be a valid
zone in the above region)

"dns_zone": "kingdom",
# this is the name of the DNS zone you setup in cloud dns

"domain_name": "domain",
# this is your primary domain name… you can setup multiple. Ie. daf-apis.com,
microns-daf.com etc. see below.

"letsencrypt_email": "my_email@aol.com",
# you need to supply an email to letsencrypt to get a SSL certificate

"docker_repository": "docker.io/caveconnectome",
# this is where it will pull docker images from, we try to publish them all to docker
hub. You could also use google cloud registry but you’d have to build/push images
there.

"add_dns_hostnames": ["add_hostname1", "add_hostname2"],
# this is where you could add alternative dns names for this server.. I.e. (global). For
simple setups. Can be an empty array.

"add_dns_zones": ["$DNS_ZONE", "add_zone"],
# these are the dns zones that those hostnames live in. should match 1-1 with
add_dns_hostnames. For simple setups this can be an empty array. We wanted to
support multiple branded global dns names (flywire, microns, etc).

"postgres_password": "my_sweet_secret",
# this is the password you will configure for your postgres database. The postgres
database will be created automatically

"sql_instance_name": "daf-global-depl",
# this is what you will call your sql instance. As you migrate to new deployments you
probably want to preserve your data and not make a new one. This is a name you
select. The sql instance, will later be called like that.

"add_storage_secrets": ["my-secret-secret.json", "my-secret-secret2.json"],
# this is a place to add more secrets in case you are connecting to data in multiple
projects For simple setups can be an empty array.

"global_server": "global.my-dns.com",
# This is the fully qualified domain name of this server, we aren’t sure if this is strictly
required but we think we did this to help ease transitions to new servers so we left
this here. Make it environment_name.domainname for now if you don’t know better.

"infoservice_csrf_key": "random_key",
# this is a secret for the info service helps secure cookies, make it something long and random you won’t need to remember it. Does not correspond to the obtained oauth credentials

"infoservice_secret_key": "random_key",
# another secret for securing the service, make it something random you do not need  to interact with it. Does not correspond to the obtained oauth credentials

"authservice_secret_key": "random_key",
# similar random thing. Does not correspond to the obtained oauth credentials

"ngl_link_db_table_name": "ngl_link_db",
# this is the name of the datastore namespace that all the shortened links will go into.

"default_admins": [
["admin1@email.com", "Admin1First Admin1Last", "Admin1PI"],
["admin2@email.com", "Admin2First Admin2Last", "Admin2PI"],
]
# these are the emails and names and PIs to grant admin access to the authorization  service by default (these emails will be added to the user table if they don’t exist every  time the service starts
Run python render_global_env.py to save a rendered environment file for the global
deployment.
Copy that rendered template (it will be called {env_name}.sh) into your environment
repository, and check it in as an initial commit.
Follow the global deployment instructions below
edit or make a copy of render_local_env.py to add values specific to your deployment.
You will need to add datastacks you created in the global to this configuration, (or edit them
into the environment after you render it from the template).
"environment_name": "depl",
# this will be the XXX in XXX.DOMAIN_NAME. Note must be unique from all others,  including global names.

"project_name": "my-project",
# google project for this deployment (can be a different one from global)

"pcg_bucket_name": "pcg-bucket",
# name of bucket where PCG edge data is stored.

"depl_region": "sweet-sweet-kingdom",
# google region to deploy to (must be valid region)

"depl_zone": "sweet-sweet-kingdom-a",
# google zone in that region to deploy to

"dns_zone": "kingdom",
# name of DNS zone you setup in clouddns

"domain_name": "domain",
# primary domain name to deploy to

"letsencrypt_email": "my_email@hotmail.com",
# email to registercertificate from letsencrypt

"supported_datastack_list": ["ds1", "ds2"],
# list of datastacks to support (configures what guidebook shows, dash shows etc)
# Can be all of them in global, but you might want to filter them out.
# TODO: make this work well if its blank? Assume you want all?

"data_project_name": "data_project",
# google project where PCG data bucket is stored, can be a different project, make  the same as project_name.

"data_project_region": "sweet-sweet-kingdom",
# project region for the PCG data bucket.

"docker_repository": "docker.io/caveconnectome",
# docker registry to pull images from

"add_dns_hostnames": ["add_hostname1", "add_hostname2"],
# extra dns names for server

"add_dns_zones": ["$DNS_ZONE", "add_zone"],
# extra dns zones for server, needs to match 1-1 with add_dns_hostnames

"postgres_password": "my_sweet_secret",
# password that will be configured by scripts for postgres server

"sql_instance_name": "daf-depl",
# name of postgreSQL instance that will be setup for annotations

"bigtable_instance_name": "pychunkedgraph",
# name of the bigtable instance you setup

"add_storage_secrets": ["my-secret-secret.json", "my-secret-secret2.json"],
# names of any extra secrets that are required by the PCG to access data. Can be  blank if you have none.

"mat_health_aligned_volume_name": "volume",
# what aligned volume name to have the materialization and annotation engine connect to in order to test that they have a healthy connection to postgreSQL. Can be any of them.

"mat_datastacks": “??”,
# One or more of the previously generated datastacks, comma separated (?)

"mat_beat_schedule": "environments/local/my_mat_schedule.json",
# the path of the file the has your desired materialization schedule, see example in  deployment repo.
# TODO: is this a relative, or absolute path?

"pcg_graph_ids": "pcg_table1,pcg_table2",
# bigtable table_ids to allow the PCG instance to connect, (add placeholder name at  first deployment). Note: Those are not (necessarily) the Bigtable table names!

"authservice_secret_key": "randomkey",
# a random key you make up here to secure auth

"global_server": "global.my-domain.com",
# what global deployment to point these services at for auth

"guidebook_csrf_key": "random_key",
# a key to secure guidebook.. Can be random

"guidebook_datastack": "datastack0",
# guidebook only supports one datastack right now, what do you want it to be?

"guidebook_expected_resolution": "4,4,40",
# what resolution should guidebook expect users to enter data with? Should usually  be the voxel resolution of the datastack.

"dash_secret_key": "random_key",
# key to secure dash service

"dash_config_filename": "my_dash_config.py",
# file to configure dash apps with, See example in repo and dash repos for documentation.

“l2cache_config_filename”: ?,
“proxy_map”: ?,
}
Run render_local_env.py to render an environment file for your first deployment.
Copy that environment file (it will be called {env_name}.sh) to your environments repository
and check it in as an initial commit.
Follow the instructions below on deploying a local environment.
Global deployment
Checkout the deployment repo at https://github.com/CAVEconnectome/CAVEdeployment Always run all scripts from the main directory of this repository
NAMING
- Make sure all the values in your environment file make sense.
- We will refer to your new file as ENV_FILE.sh
- List of important things to change:
- ENVIRONMENT
- LETSENCRYPT_EMAIL
LAUNCH
- Create your Kubernetes cluster and Redis instance
- Run
./infrastructure/global/launch_cluster.sh ENV_FILE- You will see an “ERROR (gcloud.compute.addresses.describe)” that an address resource is not available, and an “ERROR (gcloud.redis.instances.describe)” do not worry this is expected and not a problem.
- This will create a new network, subnetwork, Kubernetes cluster, and a Redis instance.
- (Choose to enable Redis if asked)
- Run
./infrastructure/global/create_service_accounts.sh ENV_FILE- (Note: If this is not your first deployment, you may see errors saying that these service accounts already exist. You can ignore those errors.)
- Add entries to your OAuth Google Cloud credential configuration in the Google Cloud Console > APIs and Services > Credentials
- Add an authorized redirect:
- Ie. https://globalv1.daf-apis.com/auth/api/v1/oauth2callback
- https://ENVIRONMENT.DOMAIN_NAME/auth/api/v1/oauth2callback
- Also add an entry for sticky_auth:
- https://ENVIRONMENT.DOMAIN_NAME/sticky_auth/api/v1/oauth2callback
- Also add authorized JavaScript origins like:
- https://ENVIRONMENT.DOMAIN_NAME
- And add the same for any alternative DNS names you configured in the environment file if applicable
- Hit save.
- Add an authorized redirect:
- Download the updated credential secret, placing it in the gcloud_keys/[ENV_NAME] folder. (Rename to oauth-secret-
.json) - If you deployed an auth server for this SQL database before and have a cave_secret already, copy it into the secrets/ENV_NAME/cave-secret.json. If not, we will revisit this step after auth is deployed and you can create a service account.
- Run
./infrastructure/global/secrets.sh ENV_FILE- (You will encounter NotFound errors when you run this the first time. You can ignore these.)
SETUP YAML FILES
- Run
./infrastructure/global/create_yaml_files_from_templates.sh ENV_FILE- Note: Might require installation of gettext on MacOS. Gettext installation
- Run
INSTALL NGINX INGRESS AND CERT-MANAGER (via helm)
- Run
./infrastructure/global/setup_ingress.sh ENV_FILE- NOTE: If the user does not have proper Kubernetes admin permissions, you will see an error like this:
- Error: UPGRADE FAILED: pre-upgrade hooks failed: clusterroles.rbac.authorization.k8s.io “contrasting-umbrellabird-ingress-nginx-admission” is forbidden: User “USERNAME@gmail.com” cannot delete resource “clusterroles” in API group “rbac.authorization.k8s.io” at the cluster scope: requires one of [“container.clusterRoles.delete”] permission(s).
- You must give the user permissions, but then need to run upgrade_cert_manager.sh as you cannot rerun setup_ingress.sh as the helm install will fail for trying to install something with the same name, and you must perform an upgrade instead.
- NOTE: If the user does not have proper Kubernetes admin permissions, you will see an error like this:
- After completion of (a):
- Wait for a minute – get a coffee – seriously, not because it will take a while locally but because you need to give the servers time to boot up in the cloud (minutes)
- Run
./infrastructure/global/dns_setup.sh ENV_FILE.- If this is not your first deployment, you will get an error when the script tries to set the DNS entry for the existing deployment that you might want to new cluster to serve. This is, in fact, a feature and not a bug, as you can verify that the new cluster is up and running and has a certificate for the old domain name before you then update the DNS manually after running this protocol to move traffic over to the new cluster.
- ERROR: (gcloud.dns.record-sets.transaction.execute) HTTPError 409: The resource ‘entity.change.additions[global.DOMAINNAME.][A]’ named ‘global.DOMAINNAME. (A)’ already exists
- Run
DEPLOY KUBERNETES MANIFESTS
- Run
./infrastructure/global/update_certificate_services.sh ENV_FILE- If failed to update, do manually update by running upgrade_cert_manager.sh
- Kubectl get certificate
- Run
./infrastructure/global/update_services.sh ENV_FILE
- Run
CONFIGURE AUTH ADMIN ACCOUNTS AND INFO SERVICE
Create new auth dataset, and service table mappings (if this is your first deployment, if it’s not, you can skip this step)
- Login to GLOBAL_ENV.DOMAINNAME/sticky_auth/admin/index.html with a Google account
- Go to Dataset, create datasets with some names. Permissions will be uniform across a dataset.
- Go to groups, create new groups and give read/write permissions to the groups for certain datasets. Permissions are additive with groups.
- Add users and add users to certain groups. All users will get added to the “default” group by default.
Create an auth secret file.
- If this is your first cluster, use the auth admin interface to create an auth service account token.
- Go to https://GLOBAL_ENV.DOMAINNAME/auth/admin/index.html#/service_account to set up a service account token
- If you already have a service account, you can use the old token.
- Save the token as a JSON file with one key
{"token":TOKEN_VALUE}. Put this file in$DEPLOYMENT_ROOT/secrets/$ENVIRONMENT/cave-secret.json. - Run
./infrastructure/global/secrets.sh ENV_FILEagain so the info service secret is created. The info service pod should now boot up properly.- Note:
kubectl describe pod infomight show “timed out waiting for the condition” - in that case, just issue anotherkubectl apply -f kubeyamls/$ENVIRONMENT/info.yml
- Note:
- If this is your first cluster, use the auth admin interface to create an auth service account token.
Add configuration to the info service:
- GLOBAL_ENV.DOMAINNAME/info
- Go to the admin interface
- Add new aligned volumes
- Need the image cloud path, i.e.,
precomputed:\\gs:\\bucket_name\folder(Note: This can be anywhere and is only presently used to setup neuroglance links for global and help Python clients point tools to where to download imagery from.) - Need a description
- Need the image cloud path, i.e.,
- Add new datastacks
- Need the aligned_volume
- Need the path to the PCG segmentation (or flat segmentation), i.e.,
graphene:\\https:\\LOCAL.DOMAINNAME\segmentation\table\XXX - Can add a default resolution for neuroglancer viewers
- Can add a custom neuroglancer instance to use
- Can add a default synapse table to use
- Can add a default soma table to use
- Can add a shortened link ID to which you add the image and segmentation to create a default view (useful if you want default meshes or annotation layers loaded for users). The link will be displayed on the info service page for this datastack.
- Setup permissions for these new datastacks/aligned volumes.
- Login to the auth flask_admin interface.
GLOBAL_ENV.DOMAINNAME/sticky_auth/flask_admin(starting in auth 2.13.1). (see https://github.com/seung-lab/middle_auth for a detailed description of each of these concepts)
Steps to add initial data (or more data to an existing auth deployment): - Create a new auth dataset if needed. If you create a new dataset, create at least one group with read and write permissions, add the service account to that group. We recommend creating a “service_accounts” group and adding the service account to that group. - If you aren’t creating a new auth dataset, decide what dataset name this data is going to live in to use in the next step. - Add new service table mappings:
| service_name | table_name | dataset |
|---|---|---|
| pychunkedgraph | all PCG table names | your auth dataset(s) |
| datastack | all datastack names | your auth dataset(s) |
| aligned_volume | all aligned volumes you added | your auth dataset(s) |
- When you are done, users should be able to log into the info service and see the datastacks and aligned volumes you have added and query them via the API.
A Hypothetical “Simple” Example:
Say H01 is a dataset. Harvard is a group with view and edit permissions on H01. jill@gmail.com is a user in the group Harvard. The datastack H01_prod has aligned volume H01_aligned_June2020 on which a set of synapses were annotated, along with a segmentation of the PCG stored in the h01_feb2022 PCG table.
To setup permissions, there needs to be a table_mapping of the “Service Name” = pychunkedgraph with table=h01_feb2022 to permission group/dataset= H01. The “service_name” datastack needs a table mapping from table=H01_prod to permission group/dataset H01. The “Service Name”= aligned_volume needs a table_mapping from table=H01_aligned_June2020 to permission group/dataset=H01. Now jill@gmail.com can edit and view any of the services that reference the H01 dataset via any of the table designations associated with it. Middle_auth_client (https://github.com/seung-lab/middle_auth_client) uses this mapping to provide services configurable decorators on endpoints to secure data appropriately.
A More Complex Example:
In this case, we might have two distinct datasets, each of which has multiple volumes, some of which have multiple segmentations, with multiple PCG tables.
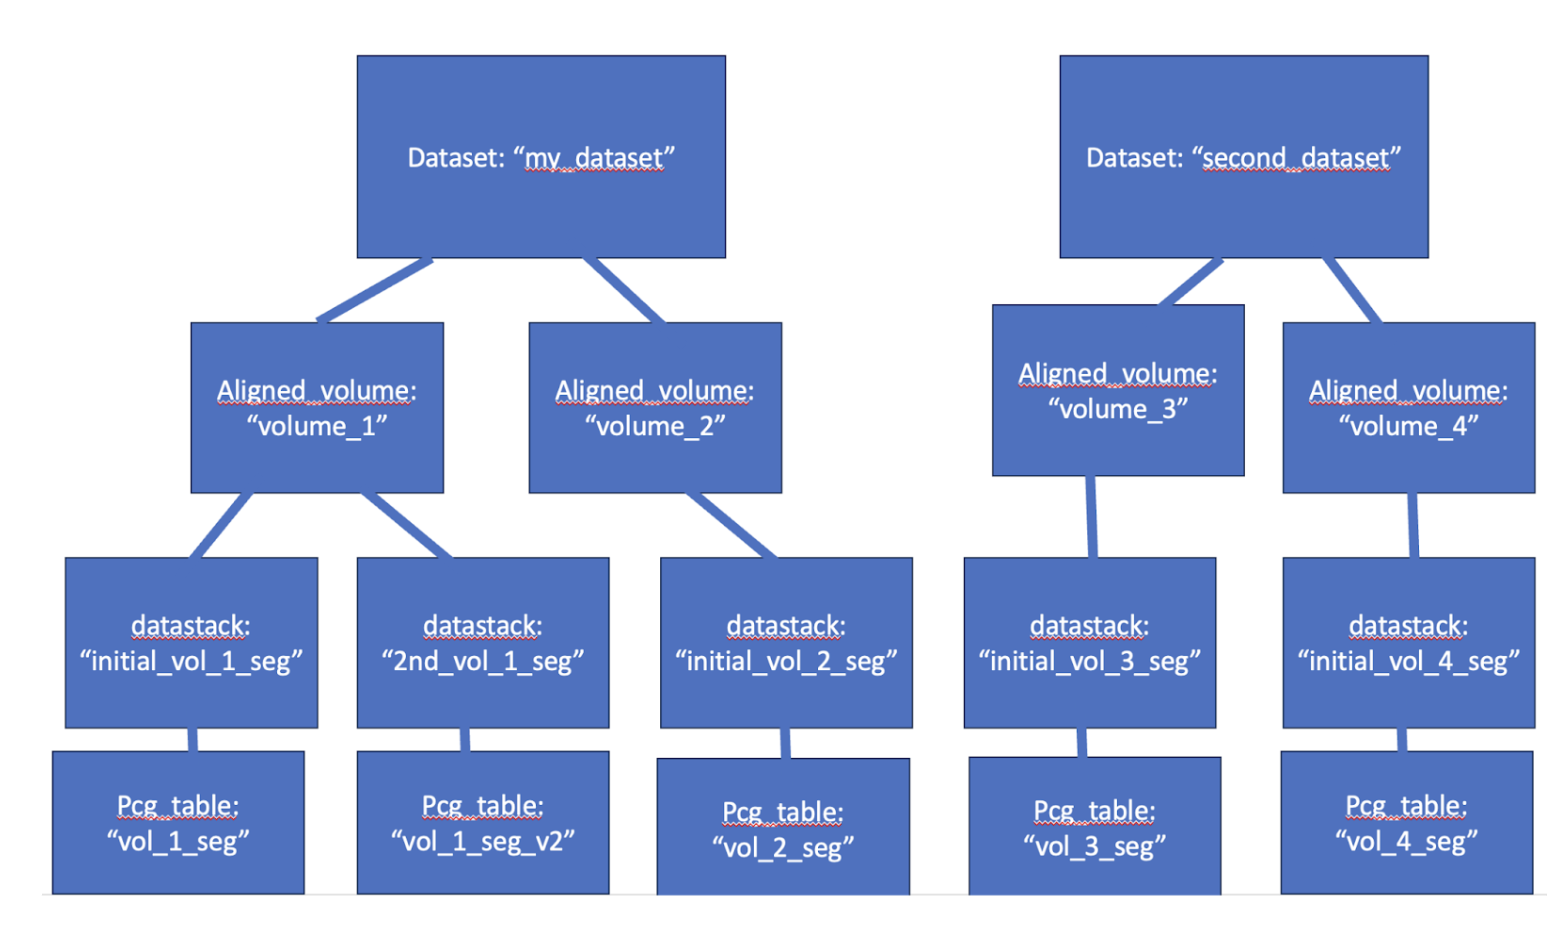
| dataset | service_name | table_name |
|---|---|---|
| my_dataset | aligned_volume | volume_1 |
| my_dataset | datastack | initial_vol_1_seg |
| my_dataset | pychunkedgraph | vol_1_seg |
| my_dataset | datastack | 2nd_vol_1_seg |
| my_dataset | pychunkedgraph | vol_2_seg |
| my_dataset | aligned_volume | volume_2 |
| my_dataset | datastack | initial_vol_2_seg |
| my_dataset | pychunkedgraph | vol_2_seg |
| second_dataset | aligned_volume | volume_3 |
| second_dataset | datastack | initial_vol_3_seg |
| second_dataset | pychunkedgraph | vol_3_seg |
| second_dataset | aligned_volume | volume_4 |
| second_dataset | datastack | initial_vol_4_seg |
| second_dataset | pychunkedgraph | vol_4_seg |
Perhaps both datasets were produced at University_1, and so members there should be able to access both, but the second dataset was done in collaboration by University_2, and so they should be able to edit only that second dataset. Auth permissions would then be set up like this:
Table 1: Group and Users
| Group | Users |
|---|---|
| University_1 | [joe@university.edu, jill@university.edu] |
| University_2 | [person@mycollege.edu] |
Table 2: Group, Permissions, and Dataset
| group | permissions | dataset |
|---|---|---|
| University_1 | read, write | my_dataset |
| University_1 | read, write | second_dataset |
| University_2 | read, write | second_dataset |
Remember, your service accounts need to be able to read and write from all datasets, so the service account needs to be in a group with global permissions on all the datastacks that it is managing. We recommend using a service_account group to accomplish this, but there are many ways to accomplish this with different security profiles.
Table 3: Service Name, Table Name, and Dataset
| Group | Users |
|---|---|
| University_1 | [joe@university.edu, jill@university.edu] |
| University_2 | [person@mycollege.edu] |
| service_accounts | [service_account1] |
| Service Name | Table Name | Dataset |
|---|---|---|
| University_1 | read, write | my_dataset |
| University_1 | read, write | second_dataset |
| University_2 | read, write | second_dataset |
| service_accounts | read, write | my_dataset |
Local deployment
Always run all scripts from the main directory of this repository
- NAMING Edit or copy a ENV_FILE.sh to reflect the choices you want to make. Place it in environments/local/ENV_FILE.sh. We will refer to your new file as ENV_FILE.sh. List of important things to change:
- ENVIRONMENT
- LETSENCRYPT_EMAIL
- DOMAIN_NAME
- Point the global names to install_redis
- LAUNCH Create your kubernetes cluster and Redis instance
- When working on a cluster upgrade, make sure to pause materialization (celery_beat_replicas=0) on the new deployment and add the legacy domain names to the new script
- Run
./infrastructure/local/launch_cluster.sh ENV_FILEYou will see an “ERROR (gcloud.compute.addresses.describe)” that an address resource is not available, do not worry this is expected and not a problem. This will create a new network, subnetwork, kubernetes cluster, and a redis instance - Run
./infrastructure/local/create_service_accounts.sh ENV_FILE(note if this is not your first deployment, you may see errors saying that these service accounts already exist. You can ignore those errors.) ERROR: (gcloud.projects.add-iam-policy-binding) User [USERNAME@gmail.com] does not have permission to access projects instance [lcht-goog-cave-temp:setIamPolicy] (or it may not exist): Policy update access denied. - Go to the auth service on the global deployment (see above if you don’t have one). GLOBALDNS/auth/admin/index.html. Create a service account and save the token as a json file with one key “token”:TOKEN_VALUE. https://GLOBAL_ENV.DOMAINNAME/auth/admin/index.html#/service_account Put this file in
$DEPLOYMENT_ROOT/secrets/$ENVIRONMENT/cave-secret.json. - Create or add any additional secrets that your services need. https://global_env.domainname/auth/admin/index.html#/service_account For example, we have bigtable in another google project, and we have various buckets that services need to have access to. Download those service accounts, and place them in the same folder (
$DEPLOYMENT_ROOT/secrets/$ENVIRONMENT/). For example, MICRONS this include the bigtable access, read/write access to the neuroglancer bucket, and read/write access to the minnie65_pcg bucket. If everything is in one bucket and project you can skip this step. - Run
./infrastructure/local/secrets.sh ENV_FILE(you will encounter NotFound errors when you run this the first time. You can ignore these.)
- SETUP YAML FILES Run
./infrastructure/local/create_yaml_files_from_templates.sh ENV_FILE- (if you don’t have helm installed.. Install it with
./infrastructure/local/get_helm.sh) - Run
./infrastructure/local/setup_ingress.sh ENV_FILE - Wait for a minute – get a coffee – seriously. The command will finish very quickly on your command line but it will take some time for all the services to get up and running properly on the cluster. (minutes)
- Run
./infrastructure/local/dns_setup.sh ENV_FILE
- (if you don’t have helm installed.. Install it with
- Install redis
- Run
./infrastructure/local/install_redis.sh ENV_FILEError: INSTALLATION FAILED: unable to build kubernetes objects from release manifest: resource mapping not found for name: “restart” namespace: “default” from ““: no matches for kind”CronJob” in version “batch/v1beta1” ensure CRDs are installed first
- Run
- DEPLOY KUBERNETES MANIFESTS
- Run
./infrastructure/local/update_certificate_services.sh ENV_FILE - Run
./infrastructure/local/update_services.sh ENV_FILE - (manually change DNS IPs from old cluster if necessary)
- Run
- Manage Redis instance
- In previously created Redis instance, export data to cloud storage
- In new Redis instance, Import data from cloud storage
- Delete previous Redis instance
Still missing from script: 1. Metric logging Debugging CrashLoopBackoff error from Materialize: Renewing Service Account Token Update token for expiring service account to keep the proofreading infrastructure alive. 1. Create a new key a. Go to Google Cloud Console of PROJECT_NAME b. At IAM & Admin > Service Accounts, click ACCOUNT_NAME which have key ID c. On Keys tab, click Add Key > Create new key d. Download JSON file 2. Update secret file a. Open the downloaded JSON file b. Copy & paste the key to the $DEPLOYMENT_ROOT/secrets/localv1/FILE_NAME.json 3. Update secrets a. Check you have gcloud_keys folders in the $DEPLOYMENT_ROOT and have globalv1 and localv1 folders in it. globalv1 and localv1 folders should have JSON files in them. i. If not, you need to run ./infrastructure/$ENVIRONMENT/create_service_accounts.sh ENV_FILE b. Check which Kubernetes cluster you are in using “kubectx” and “kubectl get pods” c. Run ./infrastructure/$ENVIRONMENT/secrets.sh ENV_FILE for both global and local.
- Check services status
- Check the created date, Google Cloud Console of Local project > Kubernates Engine > Workloads > pychunkedgraph > Configuration, click the credential name
- Check status of services,
kubectl get pods - Visit Neuroglancer and check if the mesh is well rendered # Global Cluster Deletion
Global clusters can be deleted with ./infrastructure/global/delete_cluster.sh ENV_FILE. Note this does not delete data-related resources. In particular:
- SQL databases (containing auth - referenced as
$SQL_INSTANCE_NAMEin environment) - Datastore entries with shortened link data (referenced in datastore as namespace
$JSON_DB_TABLE_NAME) - Data in cloud buckets (soon to be shortened link data, for example)
Redis is deleted because it only contains cached data. These are intentionally left to be done manually by the user to ensure the data should be deleted. Other global deployments can be pointed at those same data resources. This is how we recommend migrating to new deployments when testing a dramatically different setup of infrastructure or having a test deployment of a new service on production data without putting it into production.
Local Cluster Deletion
Local clusters can be deleted by ./infrastructure/local/delete_cluster.sh ENV_FILE. Note this does not delete related data resources. In particular:
- SQL databases (referenced as
$SQL_INSTANCE_NAMEin environment) https://console.cloud.google.com/sql/instance - Bigtable instances (referenced as
$BIGTABLE_INSTANCE_NAMEin environment)- Backing pychunkedgraph and lvl2cache instances
- Data in Cloud buckets - meshes, for example (referenced in your PCG table metadata)
These are intentionally left to be done manually by the user to ensure the data should be deleted. Other local deployments can be pointed at those same data resources. This is how we recommend migrating to new deployments when testing a dramatically different setup of infrastructure or having a test deployment of a new service on production data without putting it into production.
Configuring Annotation and Materialization
Services
The Annotation engine allows users to create annotation tables and post spatial annotations to an aligned volume dataset. The Materialization service manages looking up supervoxels underneath those spatial points and provides an API to let users query the results. Both services are backed by PostgreSQL. When you run launch_cluster.sh, it should have created a CloudSQL instance you can find in the Google console. Note, you probably do not want to create a new server every time you launch a new cluster, as you might want to preserve the data and just migrate it to a new server.
Configuration Steps
- Ensure that all your datastacks and aligned volumes are listed in the info service.
- Make sure the segmentation source is set correctly; it should have a path to the PCG source that looks like
graphene:\\LOCALDNS\segmentation\api\v1\TABLE_NAME. - You should have entries in the auth service “Service Table”. You can use the flask_admin interface on sticky auth to add these: https://GLOBALDNS/sticky_auth/flask_admin/servicetable/
- Make sure the segmentation source is set correctly; it should have a path to the PCG source that looks like
- Ensure some environment variables are correctly configured in your environment file. This includes:
POSTGRES_WRITE_USER_PASSWORD(should be a password you setup. If you didn’t set this or are unhappy with it, manually rerun the line, which was run onlaunch_cluster.sh:gcloud sql users set-password $POSTGRES_WRITE_USER --instance=$SQL_INSTANCE_NAME --password="$POSTGRES_WRITE_USER_PASSWORD")ANNOTATION_ENGINE_VERSIONMATERIALIZE_VERSION
We are constantly developing features on these services, so we recommend updating your environment file to the latest versions by checking the repos for these services. Turn on the replica settings for the services to something reasonable. Here’s an example:
```bash export ANNOTATIONENGINE_MIN_REPLICAS=1 export ANNOTATIONENGINE_MAX_REPLICAS=2 export MAT_MIN_REPLICAS=1 export MAT_MAX_REPLICAS=10 export CELERY_PRODUCER_MIN_REPLICAS=1 export CELERY_PRODUCER_MAX_REPLICAS=3 export CELERY_CONSUMER_MIN_REPLICAS=1 export CELERY_CONSUMER_MAX_REPLICAS=10 export CELERY_BEAT_REPLICAS=1
The celery consumer and producer pods manage running the lookup and update jobs, the beat_scheduler triggers regular materialization updates according to the schedule written in MAT_BEAT_SCHEDULES. MAT_BEAT_SCHEDULES should reference a JSON file that has the desired schedule of materialization. Note: The final line of that file cannot have zero indent.
If you have the zero indent line you will get a YAML parsing issue. Some autoformatting text editors will
“fix” this formatting for you and break it.
Set these variables, which control which datastack will be materialized
TODO: fix deployment to make this a list so you can have more than one datastack per deployment.
export MAT_DATASTACKS=“YOUR DATASTACK NAME”
export MIN_DATABASES=3
export MAX_DATABASES=7
We have two styles of doing materialization, the more modern one has this as False, but we are running
a bunch as True. The difference is how the tables are structured. False is much faster to materialize but
has more tables making querying more complicated. You want to be running materialization engine
>=4.8 to be using this feature (meaning False)
export MERGE_MATERIALIZE_DATABASES=False
There is a feature in the Annotation Engine that lets people that share a group in the auth system to be
able to read/write a table. Sometimes you want this to not count membership in specific groups (such as
the ‘default’ group, or some much more general groups you might have setup). You can add those
group names to this list.
ANNOTATION_EXCLUDED_PERMISSION_GROUPS=“‘default’,’my_general_group’”
MAT_HEALTH_ALIGNED_VOLUME_NAME
This should be set to an aligned volume name that you plan on posting your first annotations to, it will be
used by the health check to make sure the pod can connect to the database and restart the pod if that
connection is lost. This is helpful if someone creates a bad SQL query somehow and SQLalchemy
loses the ability to use the session due to not rolling back a query. However it adds a complication on
startup, as the first step is to create a new database, and if the health check database doesn’t exist it will
fail health checks and the pod will not come up.
To work around this, after you have setup your environment variables and rerun
./infrastructure/local/update_services.sh YOUR_ENV
You should see the annotation engine pods spin up, but the materialization pods will not fully spin up.
Use “kubectl port-forward <>deployment/materialize 8081:80” to setup a tunnel to a materialization pod.
If port forwarding fails due to the materialization pods being in CrashLoopBackOff state, try restarting
them using kubectl delete pod materialization_pod_name
Go to to connect to the web interface
Go to the API doc page
http://locahost:8081/materialize/api/doc
Find the ’CREATE ANNOTATION DATABASE` endpoint
Click the lock icon and enter an auth_token with admin permissions (can be your personal one or the
service account token you have setup).
Click “Try it out”
Type the
box”
Hit Execute (big blue bar that appears after you hit try it out).
This should return 200, and if you navigate to the cloudsql console in google cloud you should see a
new database connect.
For example:
“minnie65_phase3” is our aligned volume “production” database, this will contain all the annotation
tables and materialized tables that materialization is managing. When materialization makes a new
version it will copy that database and give it a __matXXX name. This is the database that has
guaranteed that all the root_ids/seg_ids are consistent at a specific timestamp and so querying can be
done across these tables. The production database cannot be trusted to have consistent root_ids
because materialization might be in the midst of updating them, and it cannot wrap that operation in a
giant transaction because it might be updating a 300 million row synapse table and it needs to
parallelize that work over many workers.
Make sure at this point that all the pods are successfully up and running.
You want to see all these services…
Test 1: Make an example annotation table and upload some annotations.
Using the CAVEclient or using the annotation engine REST API interface
(https://LOCALDNS/annotation/api/doc) you should be able to make a new table.
See instructions here.
https://caveclient.readthedocs.io/en/latest/guide/annotation.html#create-a-new-table
Test 2: wait a day to see that you get a new materialization database created successfully
Client.materialize. Unfortunately I don’t think our systems work correctly without a single materialized
database so you can’t query things right away.
Test 3. Query your table
client.materialize.query_table(‘MY_TABLE_NAME’)
Task 4: ingest some real data
Bulk ingestion: For large scale tables (>200,000 entries) it can make sense to use the cloudsql interface
to upload annotations in bulk using a csv format. Annotations need to be precisely formatted to match
the table schema present in the database.
MAINTENANCE TASKS.
1)
I need a new schema!
In order to create a new version of a schema you need it to be in EMAnnotationSchemas, and
you need AnnotationEngine and MaterializationEngine to be deployed that uses a version of
EMAnnotationSchemas that has that new schema.
So 1. make a PR to EMAnnotationSchemas and create a new schema. Get this accepted and
a new version of EMAnnotationSchemas released.
2. Make an update to the requirements of AnnotationEngine and MaterializationEngine to
include this new version of EMAnnotationSchemas, and create new versions of those services.
3. Update your global environment file to have a new version of EMAnnotationSchemas and
deploy it (this makes the web service that advertises schemas and creates jsonschemas
available for all schemas). Clients can use this, Dash uses this, etc.
4. Update your local environment file with the new versions of annotationengine and
materializationengine and deploy.
2)
I need a new feature of Materialization that requires migration of some non-schema tables.
a)
Creating the migrations files for version control in the Dynamic Annotation Database
repo. If you are just trying to use a feature that was already integrated into DADB,
you can skip this step.
i)
Activate a python environment that has the requirements installed from the
Dynamic Annotation Database repo.
ii)
The core of the non-schema table models live in the Dynamic Annotation
Database repo:
https://github.com/seung-lab/DynamicAnnotationDB/blob/master/dynamicann
otationdb/models.py
These table models are used to define metadata on given annotation
schema tables as well as keeping track of materialized versions of the
“production” or “live” database.
iii)
If required, modify or create a new table model in the models.py linked above
and create a PR, since these tables are shared across all projects, any
modifications should have the model remain generic for all projects.
NOTE: If a new table model is being created, choose as the inherited base to
be either the “Base” which will live in the “production” database or the
“MatBase” which will appear in every materialized database after the
migration.
iv)
Create a migration file for the model:
(1) We first need to connect to a temporary database to reflect the
current and new changes of the models. Using the docker compose
file in the base of the DynamicAnnotationDB repo startup a
database:
“docker compose up”
(2) Uncomment and Modify the path here to connect to the local
postgres on docker:
Using the following:
postgresql://postgres:annodb@localhost:5432/test_migration
(3) First we will need to use alembic to auto-generate the modifications
for the model, to do so run the following command in the alembic
directory in the repo:
“alembic revision –autogenerate -m”DESCRIPTION OF THE
CHANGE”
A new file will be added in the versions subfolder with a random
generate key with your naming e.g.::
“132nda89_DESCRIPTION_OF_THE CHANGE.py”
(4) Review the file and confirm it is changing what you want.
(5) Then run “alembic upgrade head” and check the temporary
database to see if it reflects the changes you want.
(6) Once the changes look correct, submit the changes to the PR, feel
free to add tests.
(7) Once merged, run the release.sh script in the base of
DynamicAnnotationDB:
“./release.sh minor”
(8) Activate a python env or use the current one and Install the
dev_requirements.txt file from base of the materialization repo and
Then
Bump the dynamicannotationdb in the requirements.in file in the
materialization repo
Then run the following in the terminal:
“pip-compile”
This will sort dependencies issues across the requirements files,
once done a modified requirements.txt file will appear, submit both
the requirements.in and requirement.txt to a PR.
(9) Once merged and a materialization pod is deployed to the cluster
with the new requirements go to the next step to deploy the
changes to a production database.
b)
Migrating the changes to the production database:
i)
Deploy a new version of materialization that has this migration script
ii)
Get a list of pods running on the production cluster: “kubectl get pods”
iii)
Find a materialization pod and connect to it:
“kubectl exec -it “name_of_the_pod” -c materialize /bin/bash”
iv)
Run the following cli script in the bash prompt:
python migrate.py
Follow the instructions in the CMD prompt.
python migrate.py migrate-static-schemas
and python migrate.py migrate-foreign-key-constraint
3)
I need to modify an existing annotation schema.
a)
TODO
Configuring Proofreading management service
1.
Define your configuration variables in your environment file
#PMANAGEMENT
export PMANAGEMENT_CONFIG_VERSION=1.1
export PMANAGEMENT_PROOFREADING_TABLE=“proofreading_status_public_v1”
export PMANAGEMENT_PROOFREADINGREVIEW_TABLE=“proofreading_review_public_v1”
export
PMANAGEMENT_PROOFREADINGREVIEW_TEST_TABLE=“proofreading_review_public_vtest”
export PMANAGEMENT_NEURONINFORMATION_TABLE=“neuron_information_v2”
export PMANAGEMENT_NEURONINFORMATION_TEST_TABLE=“neuron_information_vtest”
export
PMANAGEMENT_DATASTORE_BUCKET_PATH=“gs://a_googl_bucket_location/folder”
# this is not really functioning fully so can be blank
Copy a cavetoken of a service account you want to manage the tables into
secrets/pmanagement-secret.json
If you want to create a new service account go to
https://GLOBAL_DNS/auth/admin/index.html#/service_account
Use this service account to create these tables, using python.